県内の蔵元60社以上で運営される、組合活動拠点の事務所である。50名弱が収容できる会議室をメイン空間としながら、会長室、試験室、小打ち合わせ室、事務室、ロビーのある2棟の双堂形式とした。独立した屋根=天井形状を与えることにより、正面軒から落ちる雨量を最小にして、庇のタテヨコ樋を省略するための試みを意匠に加えた。
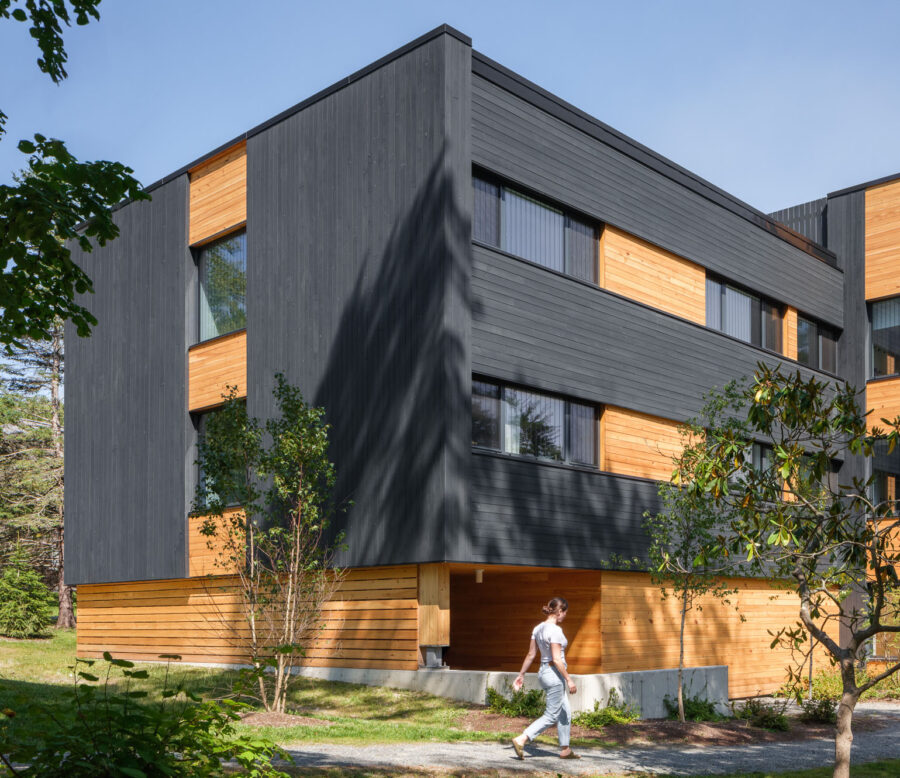
現地は、さまざまな建物に囲まれた旗竿地であり、昨今のコスト情勢や、日本の伝統的な酒蔵建築のイメージ想起を踏まえて木造2階建てとした。ここに、弊所が今までプロダクト作製で用いてきた背板(端材)を建築スケールまで拡大し、大きく5つの背板活用プロジェクトを組み込むこととした。背板とは、製材時に発生する丸太外周の端材で、通常、廃棄、もしくはチップ化されて製材所には利益が生まれにくい部分である。日本中の製材所で背板は発生し続けているが、八女の製材所のものは、大径木から切り出している*こともあり、まだまだ使える断面形状のものが定期的に副産されていたので、ここに値段を付けて、所定の金額で買い取ることにした。材料代は格安だが、寸法が一定せず三日月型の材料の加工に手間がかかる。そのトレードにより外壁材などへとアップサイクルする。(*今日では、木造住宅レベルの柱材の需要により小径木の方が単価が高いので、フローリング材を取るなら大径木となる。)
背板は、生きた成長部分であり、白身の部分なので(意匠上)色が白く、吸放湿性能が高く室内に有利に働く。現代建築において、木の表皮に近い部分を空間に活かす意匠は発展途上であり、蓄積がないため、機能上の不足を伴わないよう細心の注意を払って取り組んだ。
下記は、本作で取り組んだ5つの背板活用プロジェクトである。
1. 外壁(材料代と加工代調整のトライアル)
三面とも杉の背板およそ2,000枚で構成されている。建物の機能と意匠上、背板の荒々しい部分を用いるのはそぐわないため、大工工務店の工場で四角形断面に製材した。背板は、末口ほど窄まるため断面がすべて異なる。断面の加工精度を出すために長さは基本2mと限定されたので、立面に現れている段差は、その2mで取れるラインをベースにした。
また断面形状は、背板のかまぼこ型から決まるため、幅広になれば薄く、幅が狭まれば厚く取れる。これを2mラインの段差と合わせてデザインし、上段は幅150mm×厚さ15mm、中段は幅125mm×厚さ20mm、下段は幅100mm×厚さ25mmとした。雨切れを考慮して上の方を幅広にし、貼り方は正面からステンレスビスを@300mmで大和貼りとし、悪くなった際はそこだけ張り替えられるようにした。
重なって隠れてしまう継ぎ目の部分は、板の小口が上向きになるため弱点になるが、大工さんのアイデアで、上部と下部の材がぶつかる隅部を斜めにカットして繋ぎ合わせることで、水切れをよくするという対処を行った。塗料はタウンガード(丹宇)を表裏2回塗りし、知る限り最上級の耐久性をもたせたが、背板は辺材で、反りやすい性質があるため、丸太でよくやるような背割りを木裏側に全数施し、反りの力を弱めるための工夫をした。また仮に反ったとしても漏水をしないよう、万が一を考慮して、胴縁を打った上からもう一度防水シートを貼り、二重の防水層を確保した。
一般的な壁内通気層がなさそうに見えるが、大和貼りにすることで、二重目と一重目の間にわずかな隙間が空き、それが壁面全体を覆うため、壁内の湿気対策となっている。実は、この大和貼りの中に既製品の換気扇の吹き出し口を隠蔽しており、この隙間を利用して最終的に外部に吹き出されるようになっている。胴縁間の隙間はすべて通じているため、開口面積も十分すぎるほどだった。
上記の通り、外壁には工場での加工手間と現場での作業手間がかなりかかっているが、その分材料費は安く仕入れることができた。手間が増えたことは事実なので、逆転するための方法や意匠にはまだまだ検討の余地がある。快く引き受けてくださった山下建設の方々には感謝しかない。
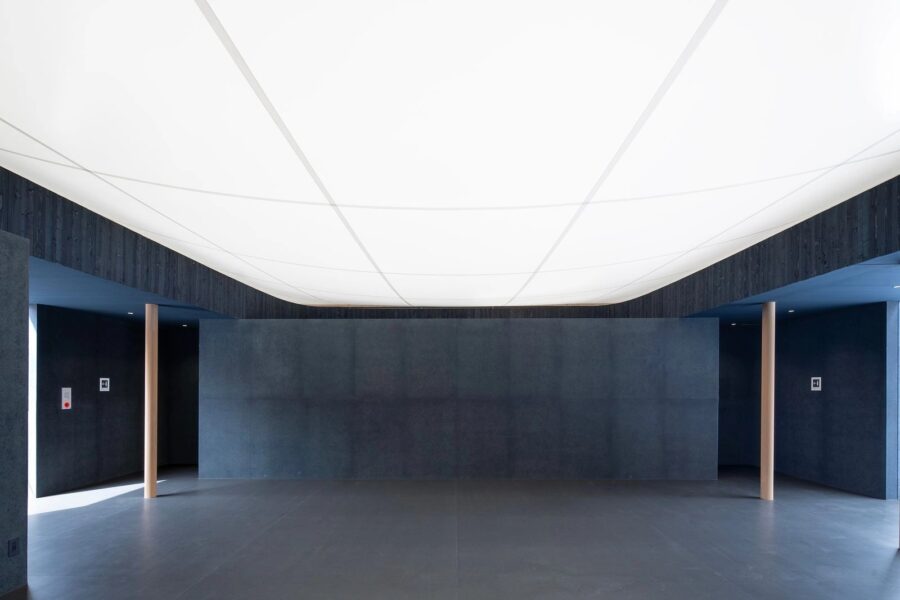
2. 天井
断面形状の異なる製材をベースにしつつ、登り梁と仕上げ材の位置関係の操作により、構造材を独立した意匠として見せるのではなく、化粧材と同化するような用い方をしている。ここでは長さ4mが必要であったため、断面は末口で30×30mm程度としている。また小断面のため、荒さが見えても良いだろうという判断をし、アクセントに背板を用い、背をそのまま見せる意匠とした。貼り方は梁間でくり返しになっているが、背板の断面は当然すべて異なっており、元口になるとその差はかなり顕著になるため、全体としてランダムに見せることができている。
現しにした登り梁は、頂部を突き合わせにせず、あえてすれ違いにさせたことで、天井に貼る板や背板にも頂部でずれが生じ、構造と化粧が一体で互いが噛み込んだような意匠となった。(この複雑な形状の端部に応じながら、内壁は2種類の漆喰いを、無段階のコテ捌き〈グラデーション塗り〉で塗り分けており、木のシャープな造形と漆喰のやわらかな形により、大工と左官の気概がここで出会い、両翼のバランスが内観全体となることを目論みた。)
3. エアコン隠し
背板を薄くスライスすれば背の荒っぽさを消していけることが分かっていたため、隙間を15mm空けて、厚み9mmの背板を使った。あえてもとの背の通り並べなかったことで、各断面の鋭角になった部分が強調され、全体が波打ったような意匠となったうえ、建具屋の手間も普通に格子を組むのと変わらなかった。先端が背の形状に伴って変形しているためか、風の抜けも問題なく、むしろ到達距離が伸びている印象なので、風洞実験を行って確証が得られれば、さらに明るい可能性を感じられる。
4. 格子戸
隙間15mm空けの、厚み15mmの背板としたが、箇所数が多いため、空間とのバランスを考慮して、背を内側に向けるものと外側に向けるものを2:3程度の割合でバラバラに混ぜた。エアコン隠しと違い、静かに波打っているような印象で、材の反り防止のために幅は15mmで設定したが、横桟を追加するなどしてもう少し薄くできた。また15mmでかつ目線に近くなってくると、やや荒さが目立ち始めるため、納品後に気になる箇所はペーパーを当てるなどした。空間と用途に対しての荒さのバランスはかなり難しいため良い事例となった。
5. 手摺りブラケット
幅35mmの背板を造作してブラケットにする予定で、図面は中央が山になった断面の背板を想定して書いたが、現場に運び込まれた背板は、片流れのような断面で、板の表と裏で全然幅が違っていた。図面通りで納まらなかったため、材料に直接鉛筆書きをして加工してもらい、なんとかその材料で納めることができた。小部材として背板を扱う場合や、寸法がシビアな場合は、材料断面が動くことを十分考慮していないと納まらない事態が発生するため注意が必要である。極論、現場で材料を見てから形を決めた方が正しいかもしれない。(高木正三郎)
A wooden office exploring the potential use of “back panels”—scrap wood from log peripheries
This office serves as the headquarters for cooperative activities operated by over 60 breweries within the prefecture. Designed as a twin-building complex, it features a main conference room accommodating nearly 50 people, along with an executive office, testing lab, small meeting rooms, administrative offices, and a lobby. The design incorporates an independent roof/ceiling shape to minimize rainfall from the front eaves, eliminating the need for horizontal and vertical gutters.
The site is a flagpole-shaped lot surrounded by various buildings. Considering recent cost trends and evoking the image of traditional Japanese sake brewery architecture, a two-story wooden structure was chosen. Here, we scaled up the end-grain boards (scrap wood) previously used by our firm in product manufacturing to an architectural scale, incorporating five major end-grain board utilization projects. Backboard refers to the offcuts generated around the perimeter of logs during lumbering. Typically discarded or chipped, this material yields little profit for sawmills. While backboard is continuously produced at sawmills nationwide, the Yame sawmill regularly generates usable cross-sections, partly due to processing large-diameter logs*. We decided to assign a value to this material and purchase it at a fixed price. While the material cost is low, the irregular dimensions and crescent-shaped pieces require labor-intensive processing. This trade-off enables upcycling into exterior wall materials. (*Today, due to demand for small-diameter timber for residential posts, small-diameter logs command higher prices. Thus, large-diameter logs are preferred for flooring.)
The back panel is a living, growing part of the wood and, being the white flesh section, has a white color (aesthetically) and high moisture absorption and release properties that benefit indoor environments. In modern architecture, designs utilizing the part of wood closest to its bark are still developing, lacking accumulated experience. Therefore, we approached this with the utmost care to ensure no functional shortcomings.
Below are the five back panel utilization projects undertaken in this work.
1. Exterior Walls (Trial Adjustment of Material and Processing Costs)
All three sides consist of approximately 2,000 cedar backboards. For both functional and aesthetic reasons, using the rough edges of the backboards was unsuitable. Therefore, they were milled into square cross-sections at the carpentry workshop. Since the boards taper toward the end grain, each cross-section is unique. To achieve precise cross-sectional machining, lengths were limited to 2m. Consequently, the stepped appearance on the facade is based on lines achievable within this 2m length.
Furthermore, the cross-sectional shape is determined by the board’s cambered profile: wider sections are thinner, while narrower sections are thicker. This was designed in conjunction with the 2m line steps, resulting in the following dimensions: top row 150mm wide × 15mm thick, middle row 125mm wide × 20mm thick, bottom row 100mm wide × 25mm thick. To facilitate rainwater runoff, the upper section was made wider. The boards were attached using stainless steel screws spaced @300mm in a “Yamato” pattern from the front, allowing for replacement of only the damaged section when necessary.
The overlapping joints, where the board edges face upward, could be a weak point. However, the carpenter’s solution involved cutting the corners where the upper and lower boards meet at an angle and joining them, improving water drainage. We applied two coats of Town Guard (Tan’u) paint on both sides for maximum durability. However, since the backboard is sapwood prone to warping, we applied back-splitting cuts to the entire back surface, similar to what’s done with logs, to reduce warping forces. Additionally, to prevent leaks even if warping occurs, we installed a second waterproof sheet over the battens as a precaution, ensuring a double waterproof layer.
While it may lack a typical internal wall ventilation layer, the Yamato-style cladding creates a slight gap between the second and first layers. This gap covers the entire wall surface, effectively managing moisture within the wall. In fact, a pre-made ventilation fan outlet is concealed within this Yamato cladding, utilizing this gap to ultimately vent air to the outside. Since all gaps between the furring strips are interconnected, the total open area was more than sufficient.
As described above, the exterior walls required considerable processing effort at the factory and on-site labor. However, this allowed us to procure the materials at a lower cost. The increased labor is undeniable, so there is still room for consideration regarding methods to offset this or alternative design approaches. We are deeply grateful to the team at Yamashita Construction for willingly taking on this project.
2. Ceiling
While using lumber with varying cross-sectional shapes as a base, the positioning of the rafters and finish materials is manipulated so that the structural members are not displayed as independent design elements, but rather integrated with the decorative materials. Here, a length of 4m was required, so the cross-section was set to approximately 30×30mm at the small end. Furthermore, given the small cross-section, it was judged acceptable for some roughness to be visible. Backing boards were used as accents, creating a design where the backs are intentionally exposed. While the installation pattern repeats between joists, the cross-sections of the backing boards are naturally all different. This difference becomes quite pronounced at the head end, allowing the overall effect to appear random.
The exposed rafters were deliberately offset at their tops rather than butted together. This caused a corresponding offset in the ceiling boards and back panels at their tops, creating a design where structure and finish interlock as a unified whole. (Responding to these complex edge forms, the interior walls feature two types of plaster applied with a continuous trowel finish [gradation coating]. The sharp lines of the wood and the soft forms of the plaster represent the meeting of the carpenter’s and plasterer’s spirit, aiming for a balanced harmony that defines the entire interior.)
3. Concealing the Air Conditioner
Knowing that slicing the back panel thinly would eliminate its roughness, we left a 15mm gap and used a 9mm-thick back panel. Deliberately avoiding the original back’s alignment emphasized the sharp angles at each cross-section, creating an overall wavy design. Moreover, the labor required for the joinery was no different from assembling a standard lattice. Perhaps because the tips deform to match the back’s shape, airflow remains unimpeded. In fact, it can reach farther. Confirming this through wind tunnel testing could reveal even brighter possibilities.
4. Lattice Doors
We used 15mm-thick back panels with 15mm gaps. Due to the large number of panels, we randomly mixed them at a ratio of about 2:3—some with the back facing inward and others outward—to balance the spatial effect. Unlike air conditioner covers, these create a softly undulating impression. The 15mm width was set to prevent warping, though it could have been slightly thinner with additions like extra horizontal slats. At 15mm and near eye level, the grain’s coarseness becomes more noticeable, so areas of concern after delivery were sanded down. Balancing this coarseness with the space and its function proved quite challenging, making this a valuable case study.
5. Handrail Brackets
We planned to fabricate 35mm-wide back panels as brackets. The drawings specified a back panel with a peaked cross-section in the center. However, the back panels delivered to the site had a single-sloped cross-section, with the front and back sides having completely different widths. Since it wouldn’t fit as per the drawings, we had the material machined directly based on pencil markings made on it, and managed to make it work with that material. When handling backing boards as small components or when dimensions are critical, insufficient consideration of material cross-section variations can lead to installation failures. In extreme cases, it might be better to decide the shape after seeing the material on-site.
【福岡県酒造組合会館】
所在地:福岡県福岡市東区馬出1-24-36
用途:オフィス
クライアント:福岡県酒造組合
竣工:2025年
設計:設計+制作/建築巧房
担当:高木正三郎、米満光平
構造設計:高嶋謙一郎(Atelier742)
施工:山下建設
撮影:設計+制作/建築巧房
工事種別:新築
構造:木造
規模:地上2階
敷地面積:865.91m²
建築面積:167.16m²
延床面積:313.09m²
設計期間:2023.07-2024.06
施工期間:2024.07-2025.03
【Fukuoka Sake Brewers Association Hall】
Location: 1-24-36 Maidashi, Higashi-ku, Fukuoka-shi, Fukuoka, Japan
Principal use: Office
Client: Fukuoka Sake Brewers Association
Completion: 2025
Architects: sekkei+seisaku/kenchikukooobooo
Design team: Shozaburo Takaki, Kohei Yonemitsu
Structural design: Kenichirou Takashima / Atelier 742
Construction: Yamashita Kensetsu
Photographs: sekkei+seisaku/kenchikukooobooo
Construction type: New building
Main structure: Wood
Building scale: 2 stories
Site area: 865.91m²
Building area: 167.16m²
Total floor area: 313.09m²
Design term: 2023.07-2024.06
Construction term: 2024.07-2025.03